What You Need to Know About LCD Display Programming

To effectively engage in coding for LCD display, you need to learn some important skills. Understanding how LCD circuits work is crucial, as it helps you avoid making mistakes. Choosing the right LCD type is also important, and you need to know how to connect its pins properly. This knowledge will ensure your project functions well. Many people utilize libraries like LiquidCrystal, which simplify the process of coding for LCD display. You must also learn about LCD initialization, as this allows you to display text or images. The table below outlines the most essential skills:
Skill/Technique | Description |
|---|---|
Understanding LCD Basics | Learn about LCD circuits to prevent errors. |
Programming the LCD | Use LCD libraries, but also practice troubleshooting issues. |
Debugging | Resolve problems such as blank or flickering LCD screens. |
Creating Custom Characters | Display unique shapes on the LCD within its memory constraints. |
You can find various tutorials and resources to practice your skills in coding for LCD display.
Shenzhen TopAdkiosk Display Technology Co., Ltd.
Add.: 2F, Bldg 10, Changfeng Industrial Park, Dongkeng, Fenghuang, Guangming, Shenzhen, China 518132
Mobile/WHATSAPP: 86-138 25769658
Email: marketing@topadkiosk.com topadkiosk@gmail.com
Skype: pghenry1
Wechat: adkioskhenry
English Web.: https://www.topkioskdisplay.com/
http://www.ad-kiosk.com/
https://www.toplcddisplay.com/
http://www.multitouchdigitalsignage.com/
https://www.youtube.com/channel/UCYVYNJHxLVEcQD8fuUxXNTA/videos?view_as=subscriber
https://www.facebook.com/TOPADKIOSKSHENZHEN/?ref=bookmarks
As long as we have the blueprints, Shenzhen TopAdkiosk Display Technology Co., Ltd no worse than anyone else.
please contact Shenzhen TopAdkiosk Display Technology Co.
Key Takeaways
Learn LCD basics so you do not make mistakes.
Pick the best LCD type for your project.
TN, VA, and IPS have different display quality and power use.
Set up wiring and pins the right way so your LCD works.
Use the LiquidCrystal library to make coding easier.
Fix problems like flickering or dead pixels by checking wires and power.
LCD Types & Selection
TN, VA, IPS Overview
When you start using an lcd module, you will find three main types: TN, VA, and IPS. Each lcd type has special features that change how your lcd module works in a project. You should check the data for each lcd to see which one is best for you. The table below shows the main differences in how they work, their good points, and their bad points:
LCD Type | Performance Characteristics | Advantages | Disadvantages | Typical Applications |
|---|---|---|---|---|
TN | High refresh rates, fast response times, low power consumption | Budget-friendly, low power usage | Poor viewing angles, color accuracy | Gaming devices, consumer electronics, industrial equipment |
IPS | Better color reproduction, wider viewing angles | Accurate color, good sunlight visibility | Higher cost, backlight bleeding | Photography, graphic design, high-end monitors |
VA | Excellent contrast ratio, decent color reproduction | Good compromise between TN and IPS | Higher response time, prone to motion blur | Home theater, general use displays |
TN lcd modules use less power and are good for fast-moving data. But, the display quality is not as good. IPS lcd modules show bright colors and wide viewing angles. They are great for projects where you want the best display. VA lcd modules have deep blacks and good contrast. They are a good choice for many uses.
Choosing the Right LCD
You should pick an lcd module that fits your project’s needs. If you need to show data fast and save power, a TN lcd is a good choice. If you want clear images and true color, you should use an IPS lcd. VA lcd modules are in the middle. They work well for home displays or when you want good contrast.
The table below helps you compare how much power each lcd type uses and how good the display looks:
LCD Type | Power Consumption | Display Quality | Characteristics |
|---|---|---|---|
TN | Lowest | Poor | Fast response, narrow viewing angles |
IPS | Moderate | Excellent | Wide viewing angles, consistent color reproduction |
VA | Moderate | Good | High contrast ratio, deeper blacks, slower response |
You also need to think about where you will use your lcd module. For example, gaming devices and machines often use TN lcd modules. They are good for fast data and use less power. High-end monitors and art tools use IPS lcd modules for better display quality. Home theaters and general displays use VA lcd modules for deeper blacks and good contrast.
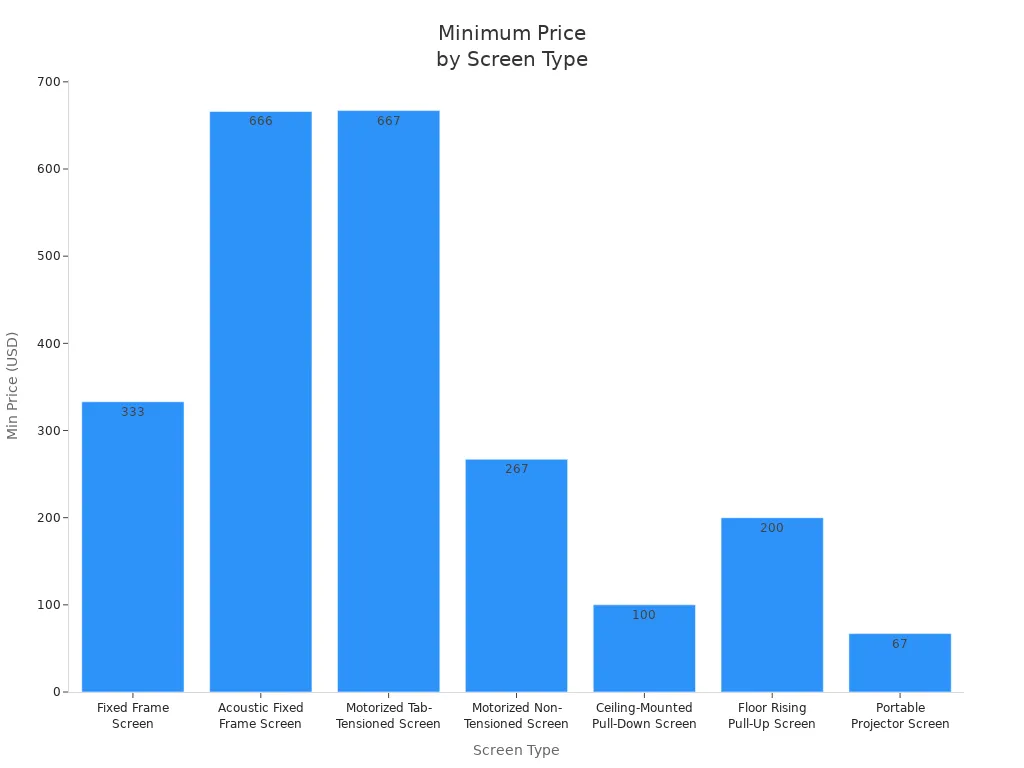
If you want to see how lcd modules compare in price, look at the chart below. It shows the lowest prices for different screen types. This can help you plan your project budget:
Tip: Always read the data sheet for your lcd module before you start wiring or programming. This helps you avoid mistakes and get the best results.
When you pick the right lcd, your data will look clear and your lcd module will work well in your project.
Hardware Setup for LCD

Wiring & Pin Configuration
When you start lcd interfacing, you need to connect the lcd module to your microcontroller correctly. Each pin on the lcd has a special job. If you want your display to work, you must follow the right wiring and pin configuration. Here is a table that shows the standard pin layout for a common lcd module:
Pin Number | Name | Description |
|---|---|---|
1 | GND (0v) | Ground Potential |
2 | VCC (5v) | Positive Voltage |
3 | Contrast | Adjusts display contrast (0v: Max, 5v: Min) |
4 | RS | Register Select (0: Instruction, 1: Data) |
5 | RW | Read/Write Select (0: Write, 1: Read) |
6 | EN | Enable Pin (activates the lcd module) |
7-14 | DB0-DB7 | Data Bus lines for sending data |
15 | A LED+ (A) | Backlight Anode |
16 | LCD- (K) | Backlight Cathode |
You must connect each pin to the right place on your microcontroller for successful lcd programming. For lcd interfacing, always check the lcd module datasheet before starting. Many people make mistakes by misplacing pins or using the wrong number of pins in the header strip. Make sure the black plastic strip sits under the lcd module PCB, so the pins reach the breadboard or wires.
Tip: Double-check your wiring before powering up. Loose connections or incorrect pin assignments can cause the display to show nothing or flicker.
Common mistakes in lcd interfacing include:
Incorrect pin assignments, which can stop data from reaching the lcd.
Poor wiring, leading to unexpected display behavior.
Forgetting the backlight connection, making the display hard to read.
Damaging lcd pins by handling them roughly.
Control Pins (RS, R/W, E)
The control pins help your microcontroller talk to the lcd module. You need to understand how each one works for smooth lcd programming.
Control Pin | Function Description |
|---|---|
RS | Register Select: 0 for command, 1 for data |
R/W | Read/Write: 0 to write data, 1 to read data |
E | Enable: Activates the lcd module to process data |
RS (Register Select): This pin tells the lcd if you are sending a command or display data. Set RS to LOW for commands, like clearing the display. Set RS to HIGH for data, like showing letters or numbers.
R/W (Read/Write): This pin controls the direction of data. Set it to LOW to write data to the lcd module. Set it to HIGH to read data from the lcd.
E (Enable): This pin lets the lcd know when to read the data lines. You must pulse this pin HIGH to send data or commands.
If you connect these control pins wrong, the lcd module will not respond to your programming. Always check your connections and make sure you use the right logic levels.
Note: Handle all lcd module pins gently. Bent or broken pins can stop the display from working and make lcd interfacing difficult.
When you follow these steps and understand the pin functions, you will have a strong foundation for lcd programming and display projects.
Coding for LCD Display
LCD Programming Tools
You need special tools to code for lcd display. Arduino is a top pick for both new and skilled users. The Arduino IDE lets you write and send your program to the board. This software makes it easy to learn how to control your lcd module.
Here is a table that lists good and bad things about using Arduino for lcd programming:
Advantages | Disadvantages |
|---|---|
Low power use | Refresh rate is slow |
High brightness | Can cause motion blur |
Great color reproduction | Not flexible, can break easily |
Simple, reliable, and cheap |
You can use jumper wires to connect your lcd module to Arduino. Always follow the right wiring and pin setup. The Arduino IDE has many libraries to help you control the lcd display. You can find these libraries in the Library Manager.
Tip: Check your connections before you upload your program. This helps stop damage to your lcd module and saves time when fixing problems.
LiquidCrystal Library
The LiquidCrystal library is a strong tool for lcd display coding. It lets you send lcd instructions and lcd data to your lcd module. The library gives you easy functions to write text, move the cursor, and clear the screen.
Here are some things the LiquidCrystal library can do:
Feature | Description |
|---|---|
Initialization | Use lcd.begin(16, 2) to set size. |
Text Display | Show words with lcd.print(). |
Cursor Control | Move cursor with lcd.setCursor(column, row). |
Clear Screen | Erase the screen with lcd.clear(). |
Home Cursor | Move cursor home with lcd.home(). |
Dynamic Content Management | Use toggles and scrolling for changing content. |
You can also use these extra functions:
lcd.blink(): Shows a blinking cursor.
lcd.noBlink(): Turns off the blinking cursor.
lcd.cursor(): Shows an underscore cursor.
lcd.noCursor(): Turns off the underscore cursor.
The LiquidCrystal library makes lcd programming easier with simple functions. These help you move the cursor, show text, and control the backlight. But, LiquidCrystal needs more wires than I2C libraries like Wire. I2C libraries use fewer wires, which is better if you have few pins.
Here is some code to show text on your lcd module:
lcd.print("Arduino"); // Shows "Arduino" on the LCD
lcd.setCursor(2,1); // Picks where the next text goes
lcd.clear(); // Clears the LCD screen
LCD Initialization
You must follow the right steps to start lcd initialization. This gets your lcd module ready to get lcd instructions and lcd data. If you miss a step, your lcd display might not work right.
Here is a normal way to start a liquid-crystal display:
Send command LCDWriteCommand(0x30).
Wait 4.1 milliseconds.
Send command LCDWriteCommand(0x30).
Wait 0.1 milliseconds.
Send command LCDWriteCommand(0x30).
Check the busy flag or wait for the default time.
The LiquidCrystal library does most of these steps for you. You just need to use lcd.begin() in your code. This sets the lcd module size, like 16 columns and 2 rows for text lcds.
Here is a simple example of lcd display coding with Arduino and the LiquidCrystal library:
#include <LiquidCrystal.h>

// Make an lcd object with the pin numbers
LiquidCrystal lcd(12, 11, 5, 4, 3, 2);

void setup() {
  lcd.begin(16, 2); // Set up lcd's columns and rows
  lcd.print("Hello, World!"); // Show text on the lcd
}

void loop() {
  lcd.setCursor(0, 1); // Move cursor to the second line
  lcd.print("LCD Display!"); // Show text on the second line
}
This code shows how to set up the lcd module, start it, and show text. You can change the words to make your own message. You can also use lcd.clear() to erase the screen and start again.
Note: Compiler warnings can show problems with lcd initialization. If your lcd module does not show text or graphics, check your wiring and the start steps. Timing problems can also cause errors, so use the right delays.
Common mistakes during lcd initialization are:
Compiler warnings about lcd instructions.
Problems with the display, like not setting a layer or drawing shapes.
Timing problems that change how your lcd module works.
You can fix most problems by checking your code, wiring, and lcd instructions. Always follow the right start steps and use the correct commands for your lcd module.
Coding for lcd display is easier when you use the right tools, libraries, and steps for lcd initialization. You can make projects that show data, graphics, and custom messages on your lcd display.
Challenges & Best Practices
Common Programming Issues
You might have problems when you use lcd modules. These problems can change how your display shows things. The table below lists the most common problems and what they mean:
Issue | Description |
|---|---|
Dead Pixels | Some pixels do not work and look like small black or colored dots. |
Backlight Bleeding | Light leaks out, making some parts of the screen too bright. |
Image Retention | Old images or shapes stay on the screen after they should be gone. |
Flickering Display | The screen blinks because of bad refresh rates, loose wires, or driver problems. |
Color Inaccuracies | Colors look wrong, often because the screen is not set up right. |
Stuck or Sticky Buttons | Buttons get stuck or do not work when you press them. |
No Signal | The screen does not turn on or says 'no signal' even when it is connected. |
You might also have trouble with slow chips, small screens, or drivers that do not work well. These things can make it hard to show lots of data or use the right library for your lcd.
Troubleshooting LCD
You can fix many lcd problems by trying a few steps. Use these ideas if your screen does not show things right:
Use a multimeter to check wires and voltage.
Try a mains induction method to test safely.
Look at cables and connectors for broken or loose parts.
Test your lcd with an LCD tester to see if it works.
Use an oscilloscope or logic analyzer to check signals.
Tip: Always check your wires and connections before you send data to your lcd. This helps stop display problems.
The table below shows tools you can use to fix lcd problems:
Tool Name | Purpose |
|---|---|
Multimeter | Checks voltage, current, and resistance. |
Oscilloscope | Looks at signal shapes. |
Logic Analyzer | Checks digital signals. |
Soldering Iron | Fixes broken connections. |
LCD Tester | Checks if the lcd works. |
Efficient Coding Tips
You can make your lcd work better by using smart coding tricks. Try these tips to help your code run well:
Use lcd.print() to show words and lcd.setCursor(column, row) to move where you write.
Change what is on the screen with lcd.clear() and lcd.home().
Move data on the screen with lcd.scrollDisplayLeft() and lcd.scrollDisplayRight().
Make the screen easier to see with lcd.noDisplay() and lcd.display().
Line up buffers with cache lines to move data faster.
Send lots of DMA data at once to stop the CPU from being interrupted too much.
You can also change things like frame buffer size, CPU speed, and flash speed. These changes help your lcd show things faster and use less memory. Using big SRAM buffers inside the chip can make the screen update quicker and lower wait times.
Note: If you use these good habits, your lcd will show things clearly and react fast.
You learned how to set up an lcd display. You used tools like Arduino to help you. You saw how to connect each Arduino pin to the lcd. This lets the Arduino talk to the lcd clearly:
Arduino Pin | LCD Pin |
|---|---|
2 | Register Select (RS) |
3 | Read / Write (RW) |
4 | Enable (EN) |
5 | Data Bus 0 (DB0) |
6 | Data Bus 1 (DB1) |
7 | Data Bus 2 (DB2) |
8 | Data Bus 3 (DB3) |
9 | Data Bus 4 (DB4) |
10 | Data Bus 5 (DB5) |
11 | Data Bus 6 (DB6) |
12 | Data Bus 7 (DB7) |
Starting your lcd the right way keeps it working well. It stops many problems from happening. Try using different lcd types in your projects. Look at guides like the Basic Character LCD Hookup Guide. Check the Arduino Reference Library to learn more and get better.
How to Code an LCD Display with Arduino
Adding an LCD display to your Arduino project is a classic way to visualise sensor data, menus, or messages. This guide follows the I2C LCD approach – the easiest and most beginner‑friendly method.
🧭 Recommended Path: Start with an I2C LCD
Traditional LCDs require 10+ jumper wires and more complex code. An I2C LCD uses a small adapter board that needs only 4 wires (VCC, GND, SDA, SCL). This makes wiring and coding much simpler.
⚙️ Step 1: Hardware Preparation & Wiring
What you need
An Arduino board (Uno, Nano, etc.)
An LCD 1602 I2C module (16 characters × 2 lines)
Wiring table
LCD I2C Module | Arduino Uno/Nano Pin | Description |
|---|---|---|
VCC | 5V | Power |
GND | GND | Ground |
SDA | A4 | I2C data line |
SCL | A5 | I2C clock line |
Note for other Arduino boards:
Leonardo: SDA → 2, SCL → 3
Mega 2560: SDA → 20, SCL → 21
💻 Step 2: Software Setup & Your First Sketch
Install the LiquidCrystal_I2C library
Open Arduino IDE → Sketch → Include Library → Manage Libraries.
Search for
LiquidCrystal I2C.Install the library by Frank de Brabander (the most popular).
Find your LCD’s I2C address (critical step)
Different I2C LCD modules may use different addresses (e.g. 0x27, 0x3F, or 0x20). Run this scanner sketch:
cpp
#include <Wire.h>

void setup() {
  Wire.begin();
  Serial.begin(9600);
  while (!Serial);
  Serial.println("\nI2C Scanner");
}

void loop() {
  byte error, address;
  int nDevices = 0;

  for (address = 1; address < 127; address++) {
    Wire.beginTransmission(address);
    error = Wire.endTransmission();

    if (error == 0) {
      Serial.print("I2C device found at address 0x");
      if (address < 16) Serial.print("0");
      Serial.println(address, HEX);
      nDevices++;
    }
  }
  if (nDevices == 0)
    Serial.println("No I2C devices found\n");
  else
    Serial.println("Scan complete.\n");

  delay(5000);
}
Open Serial Monitor (baud rate 9600). Note the address printed – you will use it in your code.
Upload your first “Hello World” sketch
Replace 0x20 in the code below with your own I2C address.
cpp
#include <Wire.h>
#include <LiquidCrystal_I2C.h>

// Set the I2C address, columns (16), rows (2)
LiquidCrystal_I2C lcd(0x20, 16, 2);   // ← change 0x20 to your address

void setup() {
  lcd.init();            // initialise the LCD
  lcd.backlight();       // turn on backlight

  lcd.setCursor(0, 0);   // first line, first column
  lcd.print("Hello, world!");

  lcd.setCursor(0, 1);   // second line
  lcd.print("Arduino LCD");
}

void loop() {
  // nothing here for now
}
Upload the sketch. You should see two lines of text on the LCD.
✨ Advanced Techniques: Make Your Display Dynamic
Once the basic text works, you can explore more functions.
Useful LCD functions
Function | Description |
|---|---|
| Clear the screen, cursor returns to home |
| Set cursor position (col 0..15, row 0..1) |
| Print text, numbers, or variables |
| Move cursor to (0,0) without clearing |
| Turn backlight off / on |
| Create a custom character (0–7) |
| Scroll the entire display |
Example 1: Display a sensor value (e.g. potentiometer)
cpp
void loop() {
  int sensorValue = analogRead(A0);   // read from pin A0

  lcd.setCursor(0, 1);                // second line
  lcd.print("Sensor: ");
  lcd.print(sensorValue);
  lcd.print("   ");                   // clear leftover digits

  delay(200);
}
Example 2: Create and display a custom character (heart)
cpp
#include <Wire.h>
#include <LiquidCrystal_I2C.h>

LiquidCrystal_I2C lcd(0x20, 16, 2);

// Define a custom character (8 bytes, each representing a row)
byte heart[8] = {
  0b00000,
  0b01010,
  0b11111,
  0b11111,
  0b01110,
  0b00100,
  0b00000,
  0b00000
};

void setup() {
  lcd.init();
  lcd.backlight();

  lcd.createChar(0, heart);          // store custom char at index 0

  lcd.setCursor(0, 0);
  lcd.print("I ");
  lcd.write(byte(0));                // print the custom character
  lcd.print(" Arduino!");
}

void loop() {}
🔧 Troubleshooting Common Issues
Symptom | Most Likely Cause | Solution |
|---|---|---|
Screen shows only a row of black rectangles | Contrast too high | Adjust the blue potentiometer on the I2C backpack with a small screwdriver. |
Wrong I2C address | Re‑run the scanner sketch and update the address in | |
No backlight, screen completely dark | Power issue | Check VCC → 5V, GND → GND. |
| Make sure you called | |
Sketch uploads fine but LCD stays blank | Loose SDA/SCL connection | Re‑seat the wires; check for broken jumper cables. |
Wrong library | Be sure you installed the LiquidCrystal I2C library (not the standard |
✅ Summary
Using an I2C LCD with Arduino is the fastest way to add a text display to your projects – only 4 wires and a simple library. Start with the “Hello World” sketch, then expand to sensor readouts or custom icons.
If you run into a specific problem or want to build a particular project (e.g. a temperature display, menu system, or game scoreboard), feel free to ask.
FAQ
What does an lcd controller do in a display project?
You use an lcd controller to manage how your display shows text and images. The lcd controller receives commands from your microcontroller. It then tells the lcd which pixels to turn on or off. Every lcd controller helps you control the display easily.
How do you connect an lcd controller to a microcontroller?
You connect the lcd controller to your microcontroller using wires. Each pin on the lcd controller has a job. You match the pins from the lcd controller to the right pins on your microcontroller. Always check the datasheet for your lcd controller before you start.
Why does my lcd controller not show anything on the screen?
You might have a wiring problem or a power issue. The lcd controller needs the right voltage and correct pin connections. Check if the lcd controller gets power. Make sure you send the right commands to the lcd controller. Double-check your code and wiring.
How do you code an lcd display with Arduino?
You use the Arduino IDE and connect your lcd controller to the Arduino board. You include the LiquidCrystal library in your code. You set up the lcd controller with lcd.begin(). Then you use lcd.print() to show text. The lcd controller follows your commands.
Can you use one lcd controller for different lcd types?
You can use one lcd controller for some lcd types if they share the same interface. Always check if your lcd controller supports the lcd type you want. Some lcd controllers only work with certain displays. Read the datasheet for your lcd controller to be sure.
See Also
Understanding LCD Display Screens And Their Functionality
Key Insights Into The Pros And Cons Of LCD Displays
Essential LCD Display Innovations To Watch For In 2026