Beginner’s Tutorial on Using Circular LCD Displays in DIY Builds
Shenzhen TopAdkiosk Display Technology Co., Ltd.
Add.: 2F, Bldg 10, Changfeng Industrial Park, Dongkeng, Fenghuang, Guangming, Shenzhen, China 518132
Mobile/WHATSAPP: 86-138 25769658
Email: marketing@topadkiosk.com topadkiosk@gmail.com
Skype: pghenry1
Wechat: adkioskhenry
English Web.: https://www.topkioskdisplay.com/
http://www.ad-kiosk.com/
https://www.toplcddisplay.com/
http://www.multitouchdigitalsignage.com/
https://www.youtube.com/channel/UCYVYNJHxLVEcQD8fuUxXNTA/videos?view_as=subscriber
https://www.facebook.com/TOPADKIOSKSHENZHEN/?ref=bookmarks
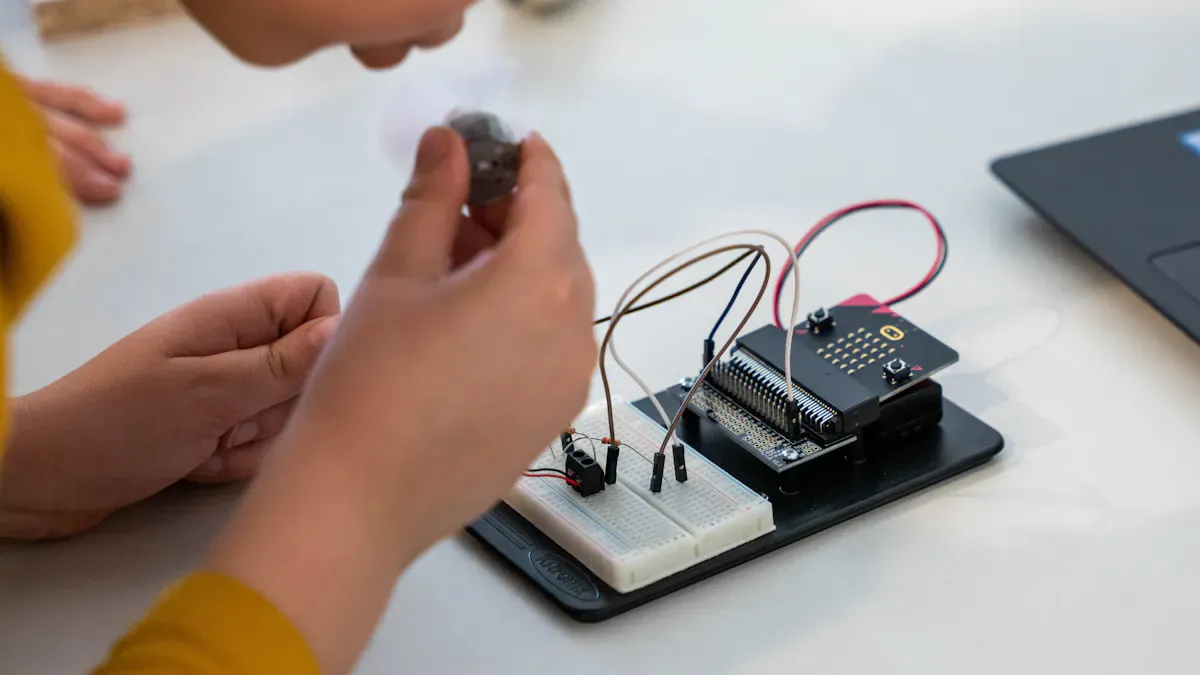
You might think working with a circular lcd display sounds tough, but you can do it with basic tools and a little patience. This type of display stands out from the usual rectangles and brings a fresh look to any DIY project. When you see a circular display light up for the first time, it feels special. The round shape draws attention and opens up new design ideas. You can show numbers, pictures, or even simple animations on the display. Don’t worry if you’re new to electronics. You can start small and still create something cool.
Key Takeaways
Circular LCD displays have a special look. They make your DIY projects more interesting. The round shape lets you create cool designs that grab attention.
Get important tools like a soldering iron, microcontroller, and safety gear. Do this before you begin your project. Being ready helps your build go smoothly.
Pick the right microcontroller and display protocol, like I2C or SPI. This choice makes sure your parts work well together. It is important for good communication between components.
Plan your graphics for the round screen with care. Put key things in the center so nothing gets cut off. This helps your project look neat and finished.
Try easy projects first, like a digital clock or weather station. These ideas help you learn and feel confident using circular LCD displays.
Getting Started with Circular LCD Displays
A circular LCD display is a screen shaped like a circle. It is not shaped like a rectangle. You can use it to show numbers, pictures, or animations. The display lights up small pixels to make images and words. A microcontroller tells the display what to show by sending signals.
Essential Materials and Tools
You should get your materials before you begin. You do not need a special workshop. Here is a list to help you:
Soldering iron and solder wire
Desoldering pump
Tweezers
Magnifying lamp
Safety glasses
Fire extinguisher (just in case)
Microcontroller (like Arduino, Raspberry Pi, or ESP32)
Bezels (aluminum or plastic)
Overlays (glass or acrylic)
These tools help you connect the display. They also help you stay safe while you work.
Choosing a Circular LCD Display
There are many displays you can pick from. Some popular ones are:
GC9A01
Waveshare RP2040 1.28" Round Touch LCD
These displays look nice and work for smartwatches or art projects. They are also good for smart home gadgets. The round shape lets you try new and fun designs. You can find displays in many sizes and resolutions. Pick one that fits your project best.
Compatible Microcontrollers
You need a microcontroller to use the display. Arduino, Raspberry Pi, and ESP32 are all good choices. Make sure your microcontroller uses the same protocol as your display. Here are some common protocols:
Protocol | Description |
|---|---|
I2C | |
SPI | Fast and works well for colorful displays. |
UART | Simple, but not as common for displays. |
Look at your display’s datasheet to see which protocol it uses. This helps you connect everything the right way.
Tip: Always check your wiring before turning on your display. This can help you avoid problems later!
Understanding Circular LCD Display Features
Key Specs and Capabilities
You may ask why a circular LCD display is special. It has a round or almost-round screen. It works like other LCDs. It uses layers to control light and color. These layers show images and words. The main thing that is different is the shape. The round shape helps you make cool designs that people notice.
Here’s a simple chart to show the differences:
Feature | Circular LCD Displays | Rectangular LCD Displays |
|---|---|---|
Shape | Circular or almost round screen area | Rectangle or square shapes |
Ergonomics | Fits people’s wrists, comfy for wearables | Regular shape, not as comfy |
Space Optimization | Uses space well, bigger screen in small size | May have empty corners |
Applications | Smartwatches, fitness trackers, meters | Phones, tablets, other devices |
Design Flexibility | Lets you try creative ideas | More normal designs |
User Experience | Easy to use for wearables | Feels normal, less custom |
Technology | Bright, saves power, sharp picture | Changes a lot |
A circular display looks new and fits well on your wrist. It is also good for small gadgets. The round shape gives you more ways to be creative.
Touch and Interactivity Options
Many circular displays let you use touch. There are two main types: capacitive and resistive. Capacitive touch is most common for smart gadgets. You can tap, swipe, or pinch, like on a phone. Resistive touch needs pressure and is not used as much.
Here is a chart about touch types:
Touch Type | Description |
|---|---|
Capacitive | Senses your finger, lets you use gestures, very exact |
Resistive | Needs pressure, not as sensitive |
Customizable | Can be made for special projects |
Capacitive touch has many good things:
You can use gestures like zoom or swipe.
The screen reacts fast to your touch.
The glass is strong and does not scratch easily.
It is easy to clean and lasts a long time.
Tip: If you want your project to feel new and smooth, pick a display with capacitive touch.
Designing for a Round Screen
Making things for a round screen is not the same as for a rectangle. You must think about how your stuff fits in a circle. Some parts might get cut off if you do not plan. Keep important things in the middle.
Here is a chart to help you compare:
Feature | Round Screens | Rectangular Screens |
|---|---|---|
Aesthetic Appeal | Classic, stylish, fits many styles | Modern, looks professional |
Comfort | Good for small wrists, wearable | Better for big screens |
Functionality | May lose corners | Uses all space well |
Best Use | Fitness, meters, smartwatches | Reading, browsing, big displays |
A circular LCD display can make your project look special. Just remember to put your graphics and words in the right spot for the round shape. This will help your display look nice and work well.
Hardware Setup and Wiring
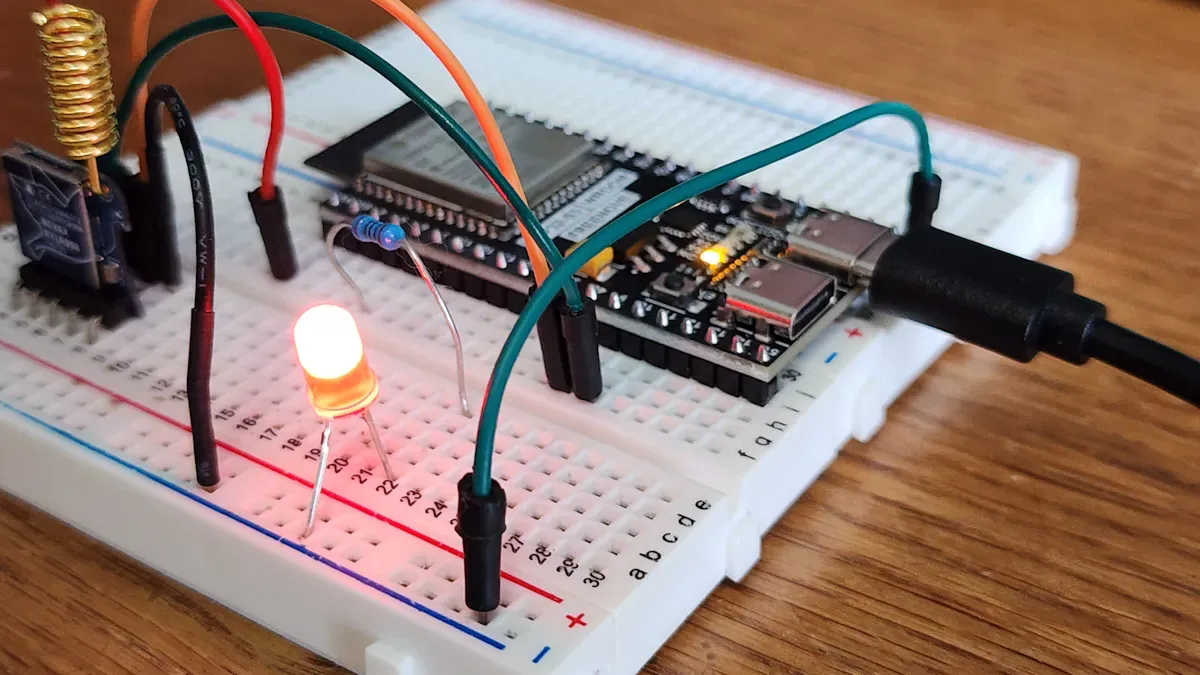
Connecting the Display
You have your circular lcd display and microcontroller ready. Now you need to connect them. Most displays use SPI or I2C to talk to your microcontroller. These are common ways for electronics to share information.
For SPI wiring:
Connect the display’s SCK (clock) pin to your microcontroller’s SCK pin.
Connect the display’s MOSI (data) pin to the MOSI pin on your microcontroller.
Attach the CS (chip select) pin to any digital pin.
Hook up the DC (data/command) pin to another digital pin.
Connect the RESET pin if your display has one.
Link the GND pin to ground and the VCC pin to 3.3V or 5V, depending on your display.
For I2C wiring:
Connect the display’s SDA (data) pin to your microcontroller’s SDA pin.
Connect the SCL (clock) pin to the SCL pin on your microcontroller.
Attach GND to ground and VCC to the right voltage.
Tip: Always check your display’s datasheet for the right pin names and voltage. Some models, like the GC9A01, need 3.3V power. Giving them 5V can break them.
Here’s a quick table to help you match the pins:
Display Pin | SPI Connection | I2C Connection |
|---|---|---|
SCK/SCL | SCK (Clock) | SCL (Clock) |
MOSI/SDA | MOSI (Data) | SDA (Data) |
CS | Any Digital Pin | Not Used |
DC | Any Digital Pin | Not Used |
RESET | Any Digital Pin | Any Digital Pin |
GND | Ground | Ground |
VCC | 3.3V or 5V | 3.3V or 5V |
If you use a Waveshare or GC9A01 circular display, follow the wiring guide that comes with it. Some displays have touch features. You may see extra pins for touch. Connect those only if you want to use touch.
Powering Up Safely
You want your display to last a long time. Safe power is very important. Most displays work with 3V to 5V. Too much power can cause ghosting or even damage the screen.
Here are some steps to power up your display safely:
Use the voltage listed in your display’s datasheet.
Do not use more power than needed.
Many displays need a square wave to work well. Steady or pulsed power can hurt the display.
If your display has a common pin, set it to INPUT_PULLUP on your microcontroller.
Set the segment pin to OUTPUT, then switch between input and output to keep the display steady.
Add a short delay (2 to 8 milliseconds) in your code to keep the image clear.
You do not need current limiting resistors like you do with LEDs.
Note: Always check the datasheet for your display. Each model can be a little different.
Initial Checks
Before you turn on your display, check everything again. This helps you avoid mistakes and keeps your parts safe.
Make sure all wires are in the right place.
Check that you used the correct voltage.
Look for loose wires or solder joints.
Double-check the pin names on your display and microcontroller.
If you use a breadboard, make sure the connections are tight.
⚡️ Power up your display only after you finish these checks. This step can save you time and money.
If your display does not light up, turn off the power right away. Check your wiring and try again. You can fix most problems by looking for simple mistakes.
Now you are ready to move on to programming your display!
Programming Basics for Circular LCD Displays
So, you’ve wired up your circular lcd display and you’re ready to see it come alive. Let’s walk through the programming basics together. You don’t need to be a coding expert—just follow these steps and you’ll get your display working in no time.
Installing Libraries and Drivers
Before you can show anything on your display, you need the right libraries and drivers. These help your microcontroller talk to the display. If you use Arduino or ESP32, you’ll find two popular options:
Library/Driver | Description |
|---|---|
GC9A01 driver | Works great for the 1.28" round TFT LCD on Arduino and ESP32. |
DIYables_TFT_Round | Lets you draw text, shapes, images, and even simple animations. |
You can install these libraries from the Arduino Library Manager or download them from GitHub. If you use MicroPython, look for display drivers made for your board. Always check the library instructions for your display model.
Tip: Make sure you pick the library that matches your display’s chip. This helps avoid weird bugs later.
Uploading Demo Code
Now it’s time to upload some demo code. Most libraries come with example sketches. You can find these in the Arduino IDE under File > Examples after you install the library. The Adafruit 1.28" 240x240 Round TFT LCD is a good starting point for beginners. Their guides show you how to wire the display, install libraries, and run sample code.
Open the example sketch for your display.
Connect your microcontroller to your computer.
Select the right board and port in the Arduino IDE.
Click the Upload button.
If you use ESP32 or MicroPython, look for demo code on GitHub or in the library’s documentation.
Verifying Display Output
After uploading, you want to make sure your display works as expected. Here’s a simple checklist:
Check if the display lights up and shows the demo image or text.
If the image looks faint, adjust the contrast if your display has a potentiometer.
Make sure the backlight turns on.
Look for clear graphics—no rainbow lines or flickering.
If you see strange colors or nothing at all, double-check your wiring and library choice.
Note: Problems like flickering or rainbow lines often mean there’s a power or timing issue. Try using shorter wires and check your power supply.
Once you see the demo running, you know your display and code are working together. Now you can start making your own graphics and projects!
Simple Projects and Troubleshooting
Displaying Text and Graphics
You can do a lot with your circular LCD display, even if you are just starting out. Try these simple ideas to get your screen working:
Show your name or a fun message like “FritzenLab.”
Add your blog address or a short greeting.
Display numbers, such as the room temperature (like 26.4°C) or humidity (like 64.7%).
Draw basic shapes, such as circles, squares, or triangles.
Make simple animations that move across the display.
You can use the example code from your library to test these features. When you see your text or graphics on the display, you know everything is connected right.
Easy Project Ideas
You can build many cool projects with your circular LCD display. Here are a few ideas to get you started:
Make a digital clock that shows the time in the center of the display.
Create a weather station that displays temperature and humidity.
Build a simple game where you tap the display to score points.
Design a colorful watch face for a wearable project.
These projects help you learn how to use the display and make your own designs. You can start small and add more features as you learn.
Common Issues and Fixes
Sometimes, your display might not work as you expect. Here are some common problems and how you can fix them:
Backlight does not turn on. Check the power supply or look for a broken inverter board.
The display flickers. Inspect your power input and check all connections.
The display looks too dark or too bright. Adjust the voltage or check for a bad T-CON board.
Some pixels do not work. Try a software fix or gently press on the display.
The display does not show anything. Look for burnt parts or a damaged ribbon cable.
If your display still does not work, follow these steps:
Make sure you set up the interface and commands the right way.
Use a multimeter to test the connections.
Update your drivers or firmware.
Look for any damage on the display.
Check for outside interference or grounding problems.
Confirm your clock and pixel settings.
Stay patient and check each step. You will get your display working and ready for more projects!
You can create amazing projects with circular LCD displays. Don’t let early mistakes stop you. Try new designs and explore features like multi-touch and custom graphics. These displays fit smart watches, dashboards, and even kitchen gadgets. Practice helps you master unique shapes and touch controls. If you want to learn more, check guides like ESP32-S3-Touch-LCD-2.1 or join forums such as AVS Forum. Your creativity and curiosity will lead to cool DIY builds!
What Is a Circular LCD Display and How Does It Work?
A circular LCD breaks the traditional rectilinear shape of displays, opening up new possibilities for product design. In simple terms, it is a technology that "breaks the rules" by using special manufacturing and driving methods to place liquid crystals inside a circular "picture frame".
🛠️ It Isn't Naturally Round
Circular LCDs are not "born" round. They are created through special "cutting" or "customisation" processes. There are two main methods:
From square to round: the "cut and reshape" method
This is the most common manufacturing approach. A circular shape is cut directly from a standard rectangular LCD panel, then the cut edges are precisely sealed and the circuits are reconnected.Advantages: Mature technology, relatively low cost.
Challenges: Edge sealing requires extremely high precision – poor sealing can lead to liquid crystal leakage or moisture ingress, affecting lifespan. Also, this process may be subject to patents, and the waste material from cutting may not be environmentally friendly.
Born different: the "native design" method
As technology has advanced, a few manufacturers (e.g., AUO) have developed more sophisticated techniques. Using specialised photo‑masks, they directly produce circular or other shaped panels.Advantages: Higher quality and reliability, very narrow bezels, more attractive design. This customised approach is now becoming popular in wearables, automotive dashboards, and other applications.
Challenges: Early versions had higher technical barriers and costs, but those have come down significantly – even small and medium‑sized enterprises can afford small‑batch customisation.
🖼️ The Secret of Pixels Inside a Circular "Frame"
The basic operating principle is similar to conventional LCDs, but the internal structure has been significantly adapted for the circular shape.
1. Basic working principle
Like all LCDs, a circular LCD controls the twist of liquid crystal molecules to "open" or "close" light, forming an image. An LED backlight is typically needed for visibility in the dark, and special algorithms precisely control each pixel to ensure smooth display at the circular edge.
2. Unique challenges inside a circle
Trimming a rectangular display into a circle requires solving several key problems:
The "pixel map" must be redrawn – Pixel arrangement at the circular edge is unique. The algorithm must precisely skip areas outside the circle and provide smooth brightness transitions for boundary pixels. Otherwise, the edge will appear jagged.
The UI must be redesigned – Traditional rectangular UI looks odd on a circular screen. New interaction interfaces are often required – concentric “radar‑style” menus are recommended to maximise usable display area.
The "light" must be uniform – The backlight module also needs custom design to ensure consistent brightness between the centre and edges of the circular screen.
The "driver circuit" must be more precise – Driving a circular screen requires higher precision to manage all pixels reliably.
✨ From Precision Engineering to Aesthetic Design
What drives these complex processes is the unique commercial value and aesthetic experience that circular LCDs bring.
Aesthetic differentiation – The circle is a highly recognisable design language that helps products stand out from the crowd of rectangular devices, giving them a unique brand personality.
Design inspiration – What a rectangular bezel cannot do, a circular one can. For example, seamlessly integrating a circular display into a matching circular housing, or combining it with physical controls like a rotary knob, creates an integrated interaction experience.
Industrial integration – Simulating traditional analogue instrument interfaces on industrial equipment fits perfectly with user habits and device aesthetics.
💡 Where Does It Shine?
Thanks to its unique shape, the circular LCD has become a favourite in many fields:
⌚️ Smart wearables – Smart watches, smart rings, fitness trackers. Compact, complete, and fits wrist aesthetics perfectly.
🚗 Automotive dashboards – Car instrument clusters, motorcycle/e‑bike displays, centre console knobs. Digital upgrades of traditional dials, can be combined with rotary controls.
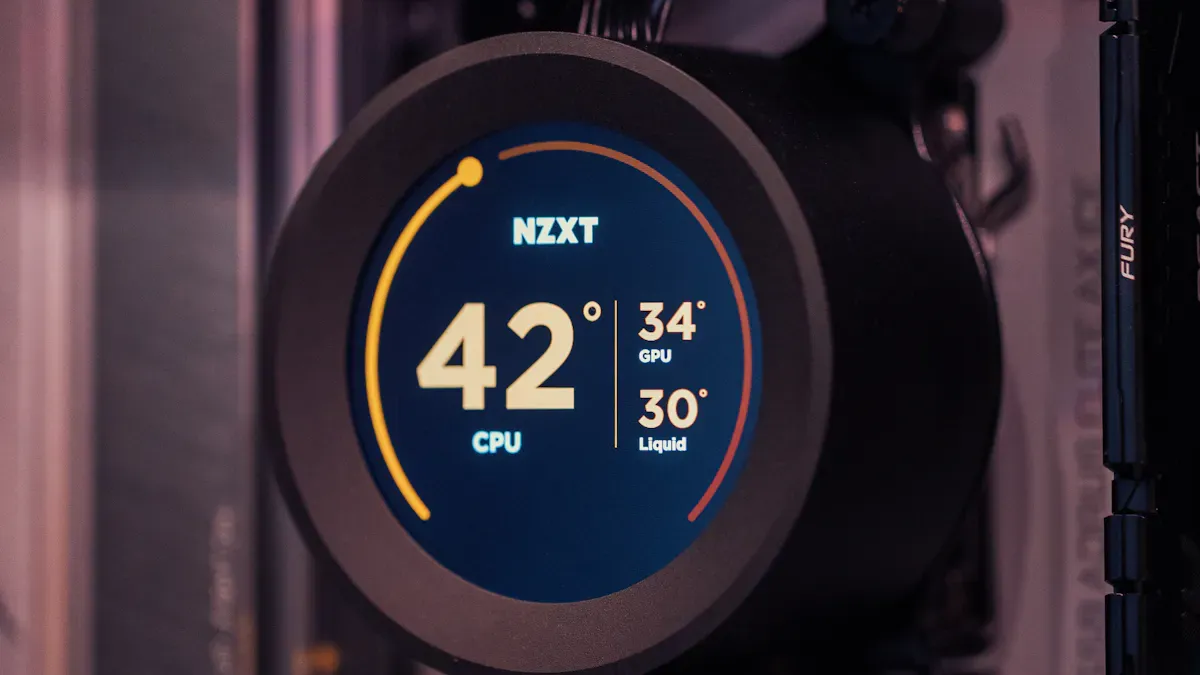
🏠 Smart home appliances – Smart speakers, high‑end coffee machines, thermostats, washing machine knobs. Infuse technology and aesthetic design into home appliances.
🏭 Industrial HMI & control – Industrial controllers, medical devices, large circular monitoring screens. Perfectly suits scenarios with rotary controls and circular panel design.
📺 Commercial & public displays – Retail circular advertising screens, innovative wayfinding signs in airports and museums. The unique shape effectively attracts attention and conveys brand messages.
Beyond these fields, many manufacturers offer complete solutions (screen + touch + driver board) to make product development faster and more convenient.
In summary, the circular LCD is a display technology that is technically challenging but full of design potential. It is not just a change in screen shape – it is a new frontier for product innovation and user experience design.
FAQ
What is a circular LCD display and how does it work?
A circular LCD display shows images and text on a round screen. You send signals from your microcontroller. The display lights up tiny pixels to create pictures, numbers, or animations. It works just like a rectangle screen, but with a unique shape.
Can I use Arduino with a circular LCD display?
Yes, you can use Arduino. Most circular LCD displays work with Arduino boards. You just need the right library and wiring. Check the datasheet for your display. Follow the example code to get started.
Why does my display flicker or show strange colors?
Flickering or weird colors usually mean you have a power issue or loose wires. Try shorter wires. Check your power supply. Make sure you installed the correct library. Double-check your connections.
How do I show text or graphics on the round screen?
You use the display library to draw text, shapes, or images. Keep important stuff in the center. Try the example code first. Change the code to add your own words or pictures.
What projects can I make with a circular LCD display?
You can build a digital clock, weather station, simple game, or a custom watch face. The round shape lets you try creative designs. Start with easy projects. Add more features as you learn.
See Also
A Beginner's Guide to DIY Transparent OLED Displays
Step-by-Step Guide to Creating a Raspberry Pi Smart Mirror
Selecting the Ideal LCD Round Display for Your 2025 Project