How to Install an LCD Display on Your Ebike
Add.: 2F, Bldg 10, Changfeng Industrial Park, Dongkeng, Fenghuang, Guangming, Shenzhen, China 518132
Mobile/WHATSAPP: 86-138 25769658
Email: marketing@topadkiosk.com topadkiosk@gmail.com
Skype: pghenry1
Wechat: adkioskhenry
English Web.: https://www.topkioskdisplay.com/
http://www.ad-kiosk.com/
https://www.toplcddisplay.com/
http://www.multitouchdigitalsignage.com/
https://www.youtube.com/channel/UCYVYNJHxLVEcQD8fuUxXNTA/videos?view_as=subscriber
https://www.facebook.com/TOPADKIOSKSHENZHEN/?ref=bookmarks
You can make your ride better with a new lcd display ebike. This can help your trips feel smoother. Many riders want bigger screens and clearer pictures. They also like backlighting and waterproof features. You may want a battery indicator or speed tracking. Some people like custom options too. The installation is easy with a step-by-step guide. If you want more info on displays, visit https://www.topkioskdisplay.com/.
Key Takeaways
Get the tools you need, like an Allen wrench, zip ties, and a small screwdriver, before you start. Make sure your workspace is clean and neat so you do not lose small parts and stay safe while working. Always turn off your ebike and take out the battery before you unplug or plug in any wires so you do not get shocked. Look at the wiring color codes closely so you connect everything the right way and do not have problems later. After you finish, test your new display to make sure it works and check for loose wires or error messages.
Electric Bike Display Tools and Parts

Before you start working on your electric bike display, you need to gather the right tools and parts. Having everything ready will make the installation smooth and stress-free. Let’s break down what you’ll need.
Tools Checklist
You don’t need a lot of fancy tools for this job. Most of these items are easy to find in a basic toolkit. Here’s what you should have on hand:
2.5mm Allen wrench (sometimes you might need a 3mm Allen wrench, depending on your bike)
Zip ties for keeping cables neat and tidy
Electrical contact cleaner (optional, but helps keep connectors clean)
Small screwdriver (for some display remotes)
Tip: Lay out your tools on a clean towel or tray so you don’t lose any small pieces during the process.
Parts Checklist
The parts you need will depend on your bike and the display kit you choose. Most installation kits include everything you need, but it’s smart to double-check before you start. Here’s a list of common parts:
New LCD display (make sure it matches your bike’s connector and protocol)
Display remote for easy control while riding
Wiring harness or connector cables
Zip ties (yes, you’ll use a few!)
Mounting bolts or screws for the display and remote
Some ebike kits also come with extra components like a controller unit, battery pack, or brake sensors. You won’t need to install these for a simple display swap, but it’s good to know what’s in the box.
If you have all these tools and parts ready, you’re set for a smooth installation. Now you can move on to preparing your workspace and getting your bike ready for its new display.
Prepare for Installation
Workspace Setup
Before you start working on your ebike, you need a safe and organized space. A good setup helps you avoid losing small parts and keeps your tools within reach. Choose a flat, stable surface like a workbench or a sturdy table. Make sure you have plenty of light so you can see all the tiny connectors and screws.
Here are a few tips to get your workspace ready:
Clear away any clutter or unnecessary items.
Lay down a towel or mat to protect your bike and catch small screws.
Keep your tools and parts sorted in small containers or trays.
Make sure your workspace is dry and away from water or damp areas.
Have a trash bin nearby for packaging or old zip ties.
Tip: Always keep drinks and snacks away from your workspace. Spills can damage your new display or wiring.
Power Off and Secure Bike
You want to stay safe while working on your ebike. Electricity can surprise you if you skip this step. Always make sure your bike is completely powered down before you touch any wires.
Follow these steps to power off and secure your bike:
Press the power button to turn off your ebike.
Remove the battery from the bike. This step prevents electrical shorts or accidental power-on.
Wait at least one minute. This gives any leftover power in the system time to drain away.
Place the battery in a safe spot, away from your workspace.
Use a bike stand or lean your bike against a wall to keep it steady.
Taking these steps helps you avoid shocks and keeps your bike safe while you work. Now you’re ready to remove the old display and start the installation!
Remove Old LCD Display
Disconnect Wiring
Before you can take off your old LCD display, you need to disconnect the wiring. This step keeps you safe and protects your bike’s electronics. Here’s how you can do it:
Make sure your bike is powered off and the battery is removed. You already did this in the last step, but double-check for safety.
Find the display cable. It usually runs from the back of the display down the handlebar and into the frame.
Look for the connector. Sometimes, you might need to follow the cable into the bike’s frame or open a small panel to reach it.
Gently unplug the display cable from the controller. Hold the connector, not the wires, and pull it apart with a steady motion.
Set the cable aside. Keep it out of the way so you don’t trip over it or pinch it during the next steps.
Tip: If the connector feels stuck, wiggle it gently. Never force it, or you might damage the pins inside.
If you notice your old display has foggy screens or unresponsive buttons, it might be time for a replacement. Here’s a quick look at common issues:
Sign of Malfunction | Possible Causes | Suggested Action |
|---|---|---|
Buttons not responsive | Dirt, broken button, wiring damage | Clean or replace the button |
Display foggy or water inside | Water ingress, seal failure | Dry or replace the display |
Remove Mounting Bolts and Remote
Now you’re ready to take the display off the handlebars. You’ll need your Allen wrench for this part.
Use a 2.5mm or 3mm Allen wrench to loosen the bolts holding the display in place.
Remove any screws or brackets that secure the remote control buttons.
Keep all bolts, screws, and brackets in a small container so you don’t lose them.
If you see zip ties holding cables, snip them carefully with scissors.
Use the appropriate Allen wrench to remove the bolts securing the display and any remote control buttons on the handlebar.
When you finish, set the old display aside. Don’t throw it in the trash. Many places, like E-Cycle Washington, recycle old electronics for free. This helps keep toxic materials out of landfills and protects the environment.
Install New LCD Display Ebike
Now you’re ready to install your new lcd display ebike. This part feels exciting because you get to see your upgrade come together. Take your time and follow each step. You’ll avoid mistakes and make sure your display works right the first time.
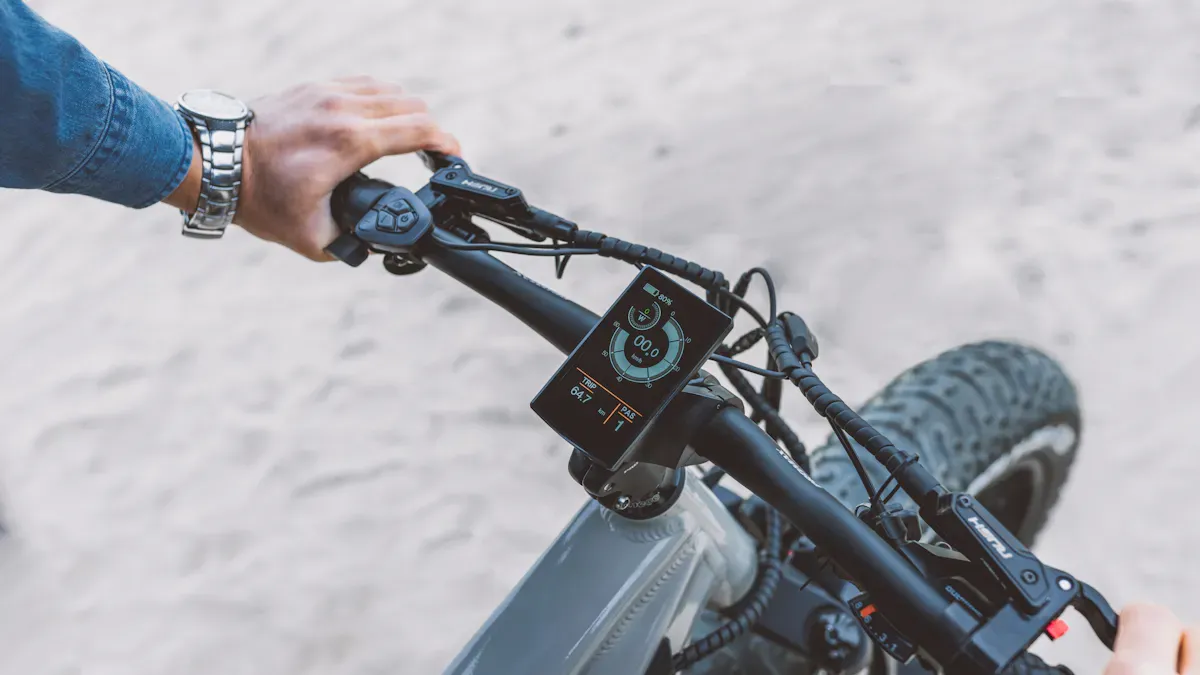
Secure Display and Remote
Start by placing the new lcd display ebike on your handlebars. Hold it in the spot where you removed the old one. Use the mounting bolts or screws from your kit. Tighten them with your Allen wrench, but don’t overtighten. You want the display to stay in place, but you don’t want to crack the bracket.
Next, attach the remote. Most remotes sit close to your left hand for easy thumb control. Use the small screws or brackets to secure it. Make sure you can reach the buttons without moving your hand too far. If your kit has a rubber pad, put it under the remote to stop it from slipping.
Tip: Before you move on, check that the lcd display ebike and remote don’t wiggle. A loose display can make it hard to read your speed or battery level while riding.
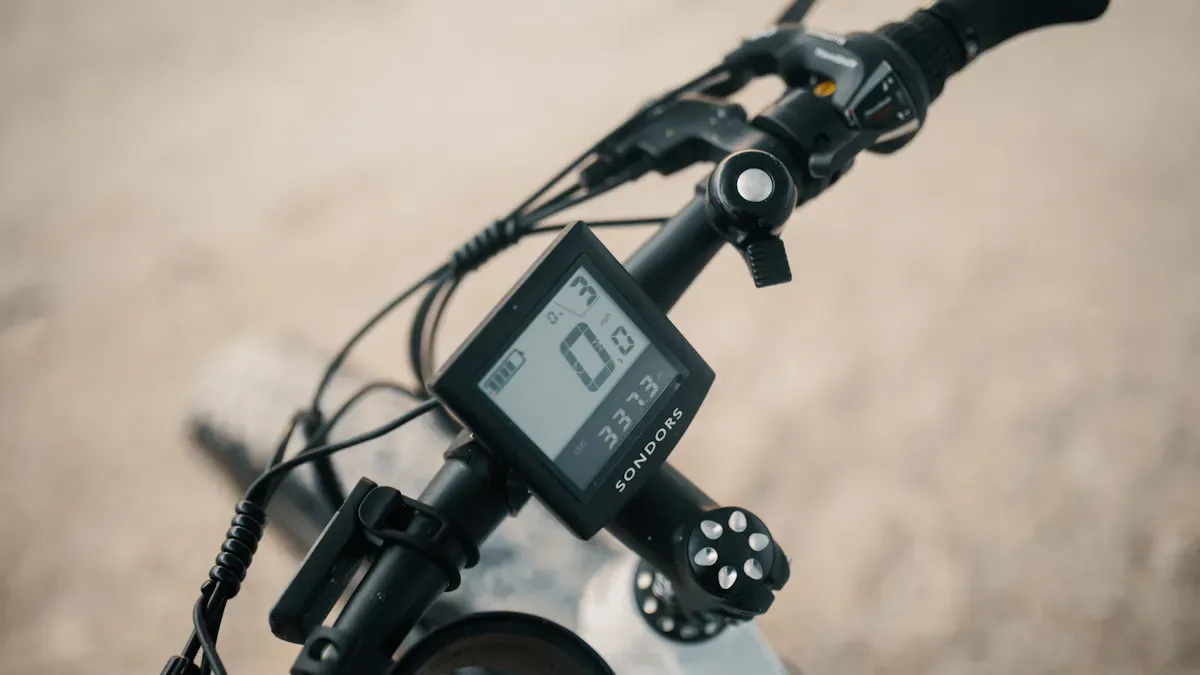
Connect to Wiring Harness
Now it’s time to connect the wires. This step is important. If you want to replace your electric bike display and have it work well, you need to match the wires correctly. Most lcd display ebike kits use color-coded wires. Here’s a quick guide:
Wire Function | Typical Color(s) | Description |
|---|---|---|
Power (VCC) | Red | |
Ground (GND) | Black | Completes the electrical circuit. |
Transmit (TX) | Green or White | Sends data from display to controller. |
Receive (RX) | Yellow or Blue | Receives data from controller to display. |
Key/Control | Purple, Brown, or other | Controls power on/off or mode switching. |
Find the matching connector on your wiring harness. Line up the arrows or marks on the plugs. Push them together until you hear a click. If you feel resistance, stop and check the pins. You don’t want to bend or break them.
If you want to replace your electric bike display, always double-check each connection. Loose wires can cause the lcd display ebike to flicker or not turn on at all. Take a moment to gently tug each wire. If it comes loose, push it back in until it feels secure.
Note: Some ebike brands use different wire colors. If you’re not sure, check your manual or look for a wiring diagram. This helps you avoid mistakes during installation.
Organize Cables and Zip Ties
You’re almost done! Now you need to tidy up the cables. Good cable management keeps your lcd display ebike looking neat and helps prevent problems later. Here’s what you should do:
Bundle extra wire length with zip ties.
Route cables along the handlebar and frame, away from moving parts like wheels or pedals.
Avoid sharp bends or kinks in the wires.
Use wire loom or cable guides if your kit includes them.
Securely routed and protected wires prevent damage, ensure consistent power flow, and contribute to a cleaner aesthetic.
Once you finish, snip off the ends of the zip ties. Make sure nothing sticks out that could scratch you or catch on your clothes. If you want to replace your electric bike display again in the future, you’ll thank yourself for keeping things organized.
Once satisfied, organize the cables neatly. Use zip ties to bundle excess length and to keep wires away from moving parts (like wheels or pedals) and sharp edges. Good cable management will prevent future accidental disconnections or chafing of wires.
Common Mistakes to Avoid
Many people rush through installation and run into problems. Here’s a quick table to help you avoid the most common mistakes when you replace your electric bike display:
Common Mistakes | Solutions |
|---|---|
Skipping Steps | Follow instructions carefully to avoid faulty installations. |
Misinterpreting Instructions | Check your manual or ask a pro if you’re unsure. |
Improper Wiring or Loose Connections | Make sure all connections are tight to prevent breakdowns. |
Warranty Reminder
Before you finish, remember that installing a new lcd display ebike may affect your warranty. Some brands only cover repairs if you use their parts and follow their instructions. If you want to keep your warranty, check your manual or contact your bike’s maker before you start installation.
Now you’re ready for the final step—testing your new display!
Test E-Bike Display
Power On and Check Display
You have installed your new e-bike display. Now it is time to see if everything works. Start by putting the battery back on your bike. Press the power button and watch the e-bike display light up. If you see numbers and icons, you are off to a good start!
Here is a simple checklist to help you make sure your e-bike display is working right:
Check your power source. Use a multimeter to see if your battery gives the right voltage.
Look at the fuse. Make sure it is not broken or burned out.
Check all wiring. Look for loose plugs or damaged cables.
Inspect the e-bike display. Make sure there are no cracks or water inside.
You should also do a few safety checks:
Look at the display cable and connectors after your first ride. Make sure everything is tight.
If you ride in the rain, use a clear cover to protect your e-bike display.
Try not to leave your bike in very hot or cold places. This keeps your display working well.
Handle your bike gently, especially on the side with the display.
Troubleshoot Issues
Sometimes, things do not go as planned. If your e-bike display does not turn on or shows strange numbers, do not worry. Here is a table with common problems and how to fix them:
Issue | Possible Causes | Solutions |
|---|---|---|
Incorrect or erratic readings | Misaligned wheel sensor, weak battery, software glitch | Adjust speed sensor, check battery, calibrate display |
One or more LEDs not working | Burnt-out LED, internal damage | Replace display unit, clean contacts |
Buttons not responsive | Stuck button, damaged wiring | Clean buttons, replace button pad or display |
Display foggy or water inside | Water ingress, condensation | Dry display, use cover, reseal or replace display |
If your e-bike display shows error codes, try these steps:
Test each part. Swap the display with another one if you can, or use a multimeter to check the voltage.
Reset or update the display. Turn off the bike and hold the reset button, or check for updates.
If nothing works, ask a bike expert or contact the maker for help.
Take your time with these steps. You want your e-bike display to work well every ride!
You just finished installing your new LCD display. This process is easier than you might think. Double-check every connection and look at your bike’s manual if you run into trouble. Keep your workspace clean for future projects. If you need help, ask a friend or a bike shop. Here’s a quick table for display care:
Frequency | Task Description |
|---|---|
Daily | Inspect and wipe down after rides. |
Weekly | Clean buttons and connectors. Check protective coating. |
Monthly | Deep check, secure connections, update software. |
Comparing the Best LCD Displays for eBikes in 2026
To help you make an informed choice in 2026, we’ve compared several mainstream LCD displays. This comparison covers core specifications, feature highlights, and estimated prices, so you can quickly find the right match for your riding needs.
🚴 2026 Mainstream eBike LCD Display Comparison
Model | Type | Brightness | Voltage Range | Screen Size | Protocol | Key Features | Estimated Price (USD) |
|---|---|---|---|---|---|---|---|
KT-LCD3 | Monochrome LCD | Standard | 24V-48V (typical) | ~2.4" | UART | Industry benchmark, stable, programmable parameters, wide compatibility | $12 – $18 |
S866 | Monochrome LCD | Standard | 24V-60V | ~2.2" | UART | Compact, clean interface, excellent value | $7 – $11 |
SW900 | Colour LCD | Standard | 24V-72V | ~2.8" | UART | Colour screen, rich data (including real-time wattage), waterproof, large user base | $14 – $36 |
KT-LCD8H | Colour TFT | Good | 24V-48V (typical) | ~2.8" | UART | Colour TFT, clean interface, USB charging port, more comprehensive data | $30 – $48 |
Bosch Kiox 400C | Colour TFT | 1000 cd/m² | Integrated with Bosch Smart System | 2.0" | CAN | Integrated mounting, rugged, auto brightness, USB-C charging, 30+ custom settings, future‑upgradable | Premium |
Ninebot 4.3" TFT | Colour TFT | High‑brightness | Integrated with Ninebot system | 4.3" | Proprietary | Large high‑brightness screen, rich riding data – standard on 2026 Ninebot entry models | ~$40 – $60 (estimate) |
Tuttio Smart Color LCD | Colour LCD | Excellent | Matches Tuttio system | 95×59.5×70mm | Proprietary | LED backlight, sunlight‑readable, PAS/cruise/eco modes, lightweight (250g) | $89 – $99 |
Price notes – General‑model prices are estimates based on market conditions. Brand‑specific models (Bosch, Ninebot, Tuttio) are usually tied to their full system cost.
🛠️ Buying Tips & Key Considerations
Beyond specifications, keep these important points in mind:
1. Protocol matching is the #1 priority
This is the most overlooked but essential factor for proper operation. eBike displays communicate with the controller using UART or CAN protocols – they are electrically and functionally different. Mismatching them can result in a non‑functional display.
UART – Common on entry‑level and DIY controllers (e.g., KT, some Bafang models).
CAN – Common on premium brand systems (e.g., Bosch, Shimano, Bafang M series).
Always verify that your display and controller use the same protocol – this is the foundation for a working system.
2. Focus on practical performance
Water & dust protection (IP rating) – For outdoor e‑bike use, choose a display with at least IP65 rating to ensure safe riding in rain.
Vibration resistance – Quality displays use reinforced internal structures and durable housing materials (e.g., ABS engineering plastic) to withstand road vibrations and ensure long‑term reliability.
3. Match features to your riding needs
Daily commuting – Basic models like S866 or KT-LCD3 are sufficient – affordable and fully functional.
Performance tracking / long‑distance touring – Consider SW900 or KT-LCD8H – colour screens and extra data (e.g., real‑time power) better meet your needs.
High‑end integrated / off‑road – A display like the Bosch Kiox 400C is the better choice – more durable, smarter, and deeply integrated with the whole e‑bike system.
💎 Summary
Choosing an e‑bike display doesn’t have to be complicated. For value‑conscious daily commuting or DIY builds, SW900 and KT-LCD3 remain mainstream choices – widely available, well‑documented, and with proven compatibility. If you want a more advanced display experience, deeper vehicle integration, and future‑ready technology (e.g., superior glare resistance, smart riding apps), then opting for a complete e‑bike with a new‑generation OEM display (such as the Bosch Kiox 400C or equivalent) will deliver a better overall experience.
Let me know if you need a printable version or a more detailed comparison of specific models!
FAQ
What tools do I need to install an LCD display on my ebike?
You need a 2.5mm or 3mm Allen wrench, zip ties, and a small screwdriver. A clean workspace helps a lot. Most kits include everything else you need.
Can I install an LCD display if I’m new to ebike repairs?
Yes! You can follow the steps in this guide. Take your time. Double-check each connection. If you get stuck, ask a friend or visit a bike shop.
My new display won’t turn on. What should I check first?
Start with the basics:
Make sure the battery is charged and connected.
Check all wiring for loose plugs.
Look for error codes on the screen.
How do I keep my LCD display safe from rain?
Use a clear cover or shield. Wipe the display after wet rides. Store your bike indoors when you can. Most modern displays are water-resistant, but extra care helps them last longer.
What are the best LCD displays for ebikes in 2026?
You’ll see top picks like the Bafang DP C18, KT-LCD8H, and Bosch Intuvia 100. These displays offer bright screens, waterproofing, and easy controls. Always check if the display matches your bike’s system before you buy.
See Also
Step-by-Step Guide to Setting Up Digital Signage
Best Places to Purchase Sturdy LCD Kiosks for Malls
Understanding LCD Display Screens and Their Functionality