A Complete Guide to Setting Up a Digital Podium for Modern Classrooms

Shenzhen TopAdkiosk Display Technology Co., Ltd.
Add.: 2F, Bldg 10, Changfeng Industrial Park, Dongkeng, Fenghuang, Guangming, Shenzhen, China 518132
Mobile/WHATSAPP: 86-138 25769658
Email: marketing@topadkiosk.com topadkiosk@gmail.com
Skype: pghenry1
Wechat: adkioskhenry
English Web.: http://www.topadkiosk.com/
https://www.topkioskdisplay.com/
http://www.ad-kiosk.com/
https://www.toplcddisplay.com/
http://www.multitouchdigitalsignage.com/
https://www.youtube.com/channel/UCYVYNJHxLVEcQD8fuUxXNTA/videos?view_as=subscriber
https://www.facebook.com/TOPADKIOSKSHENZHEN/?ref=bookmarks
Imagine walking into a classroom where you control every device with just a touch. You can set up a digital podium by choosing a good spot, connecting all the parts, and making sure everything works together. A digital podium helps you teach in new ways and keeps students engaged. It feels like using an Intelligent digital podium for conference, but made for your classroom. You might face a few bumps along the way:
Some people prefer old-school teaching.
Technology can act up and stop your lesson.
Devices might not always work well together.
Still, the rewards make it worth the effort.
Key Takeaways
Pick a good spot for your digital podium so everyone can see and reach it.
Put the hardware together with care and connect each device tightly. This helps stop problems during class.
Add software that is easy to use. It should let you talk with students and manage lessons quickly.
Check your digital podium often. Clean it and look at the hardware to keep it working well for a long time.
Use the interactive features of the digital podium. These help students join in and make lessons more fun.
What Is a Digital Podium?
Definition and Purpose
A digital podium is not just a regular lectern. It is much more than that. In schools, a digital podium is like a control center for teachers. You can use it to run presentations and control the sound. You can even turn classroom lights on or off from one place. This tool helps you teach in ways that keep students interested. It uses things like videos, pictures, and sound to make lessons fun. You can write on the screen and talk with students right away. You can also switch how you teach very quickly. Many features from an intelligent digital podium for conference are now used in classrooms. This makes teaching smarter and more exciting.
Here’s a quick comparison:
Feature | Traditional Podium | Digital Podium |
|---|---|---|
Purpose | Holds materials | |
Communication | One-way | Two-way engagement |
Technology Integration | Basic AV equipment | Multimedia, AV control, content management |
Flexibility | Fixed setup | Hybrid lessons, real-time annotation |
User Experience | Passive | Dynamic and engaging |
Benefits and Challenges
A smart digital podium gives your classroom many good things. You get to use touch screens and digital boards. You can show videos and play sounds for better lessons. You can save data and check how well you are teaching. Students can ask questions and join talks more often. You can even work with people who are not in the room.
Real-time engagement and annotation
Multimedia integration for richer learning
Centralized control for presentations and content
Supports hybrid and smart class environments
Encourages higher student participation
There are some problems you might face. Sometimes the technology does not work right. Some people do not like new ways of teaching. Devices may not always connect well. But the good things are worth it. You can teach better and help students learn more.
Smart Digital Podium Features
A smart podium brings a lot of power to your classroom or conference room. You get tools that make teaching and presenting easier, faster, and more interactive. Let’s look at the main features you’ll find in a smart digital podium.
Touch Panel Controls
You don’t need to fumble with lots of buttons or remotes anymore. With a smart podium, you use a touch panel to control everything. You can change the volume, switch between screens, and connect devices with just a tap. This makes your lessons or meetings run smoothly. You save time and keep everyone focused. The touch panel puts all the controls in one place, so you don’t get confused or distracted.
Tip: If you ever feel lost, just look at the touch panel. It guides you step by step.
Hybrid Integration
A smart digital podium helps you teach or present to people in the room and online at the same time. You can write, draw, and share your screen live. Everyone, even those joining from home, can see your notes and ask questions. Some smart podiums work with platforms like Microsoft Teams or Zoom. You can switch between slides, videos, and live chats quickly. This keeps your class or meeting moving and everyone involved.
Real-time collaboration lets you highlight and share ideas instantly.
Hybrid-friendly design means remote and in-person students or guests stay connected.
You get a professional setup that looks and feels smooth.
Output Device Connectivity
A smart digital podium connects to many devices. You can plug in a projector, a big screen, or speakers. Here’s a quick look at what you can connect:
Output Device Type | Connectivity Options |
|---|---|
Display Output | HDMI output for large screens or projectors |
OPS Signal Output | 2 HDMI, 1 VGA, 1 XLR Mic, 3.5mm Audio, Ethernet, USB |
You can set up your smart podium in classrooms, training halls, or conference rooms. The digital podium gives you the flexibility to move and connect wherever you need.
Digital Podium Components
Hardware Overview
A digital podium is more than just a stand. It has many smart parts that help you teach. Here are the main things you will find:
Component | Description |
|---|---|
Touchscreen Display | 21.5-inch screen with pen support and motorized tilt for easy control. |
Connectivity Options | HDMI, VGA, USB, and power sockets for all your devices. |
Audio System | Dual 25W speakers, 60W amplifier, gooseneck and wireless microphones. |
Ergonomic Design | Metal body, sliding tray, and cooling fans for comfort and durability. |
You might also see a built-in computer and an interactive pen display. Some podiums have a document camera and wireless charging too. These features make it easy to teach and share your work.
Tip: Make sure your digital podium has cooling fans. They help keep your equipment safe during long lessons.
Software Essentials
The right software makes your digital podium very useful. You can use teaching software for fun lessons. Annotation tools let you write or draw on the screen. You can record or stream your class with special apps. Security features protect your files. Remote monitoring tools help you manage your devices.
With these programs, you can teach in class or online. You can save your work and share it. Your files stay safe and easy to find.
Connectivity Options
You need to connect your digital podium to other devices. Most podiums have HDMI, VGA, and USB ports. You can plug in projectors, big screens, or microphones. Some podiums let you connect wirelessly for more choices.
If you want to move your podium to different rooms, look for strong network support. This helps you set up fast wherever you go.
Digital Podium Setup Guide
Setting up a digital podium in your classroom can feel like a big project, but you can break it down into simple steps. This step-by-step guide will help you get everything running smoothly, just like an intelligent digital podium for conference settings. Let’s walk through each part of the digital podium setup so you can teach with confidence.
Location Selection
First, pick the right spot for your digital podium. You want everyone in the room to see you and your screen. Place the podium where you have a clear view of your students and easy access to power outlets. Avoid corners or spots with glare from windows. Make sure there’s enough space for you to move around and for students to approach if they need help.
Tip: Test the spot by standing behind the podium and checking if you can see the whole class and if the screen is visible from every seat.
Hardware Assembly
Now it’s time to put the podium together. Follow this step-by-step guide to assemble the hardware:
Assemble the podium body. Make sure all panels and screws fit tightly.
Install internal hardware, like the computer and power supply.
Connect the display to the main unit.
Secure all components so nothing wobbles or moves.
Mount the touch screen in a comfortable position.
Install the CPU and connect it to the display and other parts.
Set up microphones and the audio system for clear sound.
Connect the document camera if you plan to show papers or objects.
Install Wi-Fi or LAN cables for network access.
Lock and secure all ports to keep your equipment safe.
Take your time with each step. If you get stuck, check the manufacturer’s instructions. They often include helpful diagrams.
Device Connections
Once the hardware is ready, you need to connect your devices. Here’s what you should do:
Place the podium close to a power outlet. This helps prevent power issues during class.
Plug the podium into a power source and connect it to the Internet. This lets you use all the smart features.
Add extra devices like document cameras, microphones, or speakers to customize your digital podium setup.
Use HDMI, VGA, or USB ports for displays and projectors. Make sure cables are secure and not in the way.
Note: Double-check every connection before you turn on the system. Loose cables can cause problems during your lesson.
Software Installation
With your hardware and devices in place, you can move on to software. This step-by-step guide will help you get the most out of your digital podium setup:
Install the operating system and teaching software. Choose programs that let you annotate, record, and share lessons.
Harden the operating system by turning off services you don’t need and setting up firewall rules.
Segment your network if possible. This keeps your podium safe from other devices on the school network.
Use strong passwords and limit who can access the admin settings.
Set up automatic software updates. This keeps your system secure and running smoothly.
Use content management tools to organize your files and lessons.
Enable remote locking and wiping features. If your podium is lost or stolen, you can protect your data.
Tip: Write down your passwords and keep them in a safe place. Don’t share them with students.
Audio and Visual Configuration
Great sound and visuals make your lessons more engaging. Here’s how to set up your digital podium for the best classroom experience:
Description | |
|---|---|
HDMI Matrix Integration | Use the built-in HDMI matrix for fast, smooth switching between sources. |
Continuous Display Output | Make sure your screen stays on when you switch content, so students don’t miss anything. |
User-Friendly Interface | Use the touch panel to control audio and video easily. |
Unified Control | Adjust displays, audio, and AV equipment with one touch. |
Integrated Audio Controls | Manage microphones and speakers from the podium, no extra mixers needed. |
Test your audio by speaking into the microphone and listening from the back of the room. Adjust the volume so everyone can hear you, but not so loud that it echoes. Check your visuals by switching between slides, videos, and the document camera.
Security Setup
Protecting your digital podium setup is just as important as making it work. Here’s how you can keep your system and data safe:
Use SSL to secure your data and connections.
Follow security standards like PCI DSS if you process payments.
Replace sensitive data with tokens to keep it safe.
Turn on two-factor authentication for extra protection.
Audit your security settings often to find and fix weak spots.
Require strong passwords for all accounts.
Monitor user activity to spot any unusual behavior.
Only accept secure payment methods if needed, like Google Pay or Apple Pay.
Keep all software updated to block new threats.
Don’t store payment data unless you have to.
Note: Security is not a one-time job. Check your settings regularly and update them as needed.
By following this step-by-step guide, you can complete your digital podium setup with confidence. You’ll have a smart, secure, and flexible teaching tool that brings your classroom into the future.
Digital Podium Installation and Maintenance
Setting up your digital podium is a big job. You want it to work well for every lesson. This is true for in-person or hybrid classes. Let’s look at how to install it, keep it working, and fix problems fast.
Initial Installation Steps
You need to follow each step when you install your digital podium. If you skip a step, you might have problems later. Here’s a simple table to help you with the setup:
Step | Description |
|---|---|
1 | Put the monitor into the cabinet on top of the podium. |
2 | Untie the cables and plug them into the monitor. |
3 | Use the screws to hold the monitor in place. |
4 | Find the screws on the back of the monitor and tighten them. |
5 | Put the PC on the rack inside the podium and plug in the power cable. |
6 | Plug the audio cable and USBs into the PC. |
7 | Plug the speaker cable into the amplifier. |
8 | Turn on the podium and all the devices you connected. |
Check that every cable is tight and every screw is tight. If you use a hybrid setup, make sure your network and Wi-Fi are ready. Test the touch screen and sound before your first class. If you have an intelligent digital podium for conference, the steps are almost the same. But in classrooms, you need to think about how students can see and reach the podium.
Tip: Always read the instructions from the company that made your podium. If you get stuck, look at the pictures or ask someone for help.
Maintenance Tips
You want your digital podium to last a long time. Doing regular checks helps stop problems before they start. Here are some things to do:
Look at the hardware, like power and fans, every month.
Check the screen and touch every day.
Wipe dust off screens and vents often.
Keep the room between 68-72°F (20-22°C).
Keep humidity at 45-55% RH to stop water or static.
Watch for glare on the screen. If colors look faded, fix the lights or use shades.
Make sure the podium does not shake. If you see a blurry image or loose parts, fix them fast.
Here’s a table to help you spot and fix problems:
Environmental Factor | Optimal Range | Warning Signs | Corrective Actions |
|---|---|---|---|
Temperature | 68-72°F (20-22°C) | Hot, loud fans | Make air flow better, change HVAC settings |
Humidity | 45-55% RH | Water drops, static | Use a humidifier or dehumidifier |
Dust Levels | Minimal | Dust on screen or vents | Clean more, use better filters |
Ambient Light | <500 lux | Glare, faded screen | Use shades, move the podium |
Vibration | Minimal | Blurry image, loose parts | Make the podium steady, tighten screws |
Note: Do a deep clean every month. This helps you find problems early. If you teach hybrid classes, check your network and streaming tools as part of your routine.
Troubleshooting Basics
Sometimes things break or stop working. You want to fix them fast so your class is not stopped. Here’s a table with common problems and how to fix them:
Issue Type | Troubleshooting Technique |
|---|---|
Power Button Indicator Issues | Make sure the video cable is less than 50 feet. Turn off your computer and check the power. |
Status Indicator Issues | See if the pen works with the display. |
VGA Display Issues | Set the video card’s resolution for your SMART Podium. |
Control and Writing Issues | Make sure SMART Product Drivers are running. |
Digital Ink Issues | Check pen settings in SMART Notebook or Meeting Pro. |
Handwriting Recognition Issues | Delete broken ink files from your Mac. |
If your podium has hybrid features, test video and sound before each class. If the screen looks wrong, check cables and settings. If the touch screen does not work, restart the system and look for updates.
Callout: Keep a list of fixes nearby. If you solve problems quickly, your lessons will go well and students will stay interested.
You can set up, care for, and fix your digital podium with confidence. Your classroom will be ready for modern teaching and hybrid learning.
Guide to Choosing a Digital Podium
Product Features
You want a digital podium that works well in your classroom. Start by using a guide to compare what each podium can do. Pick a screen that is between 23 and 43 inches. This size lets students see the screen clearly. The screen should have at least 1080p resolution. If you want to show very clear pictures, 4K is even better. Make sure the podium works with Zoom, Teams, and Google Meet. The touch screen should react in less than 50ms. This helps your lessons go smoothly. Noise-canceling microphones make your voice sound better. It is good if you can add webcams or document cameras later. A cloud-based content management system lets you update lessons from anywhere. The podium should be strong. Look for IP54 or higher so it lasts longer.
Criteria | Details |
|---|---|
Minimum MOQ | Pick suppliers who let you buy just one for testing. |
Choose 23" to 43" screens for easy viewing in class. | |
Resolution | The screen must be at least 1080p. 4K is best for sharp images. |
Integration Compatibility | Make sure it works with Zoom, Teams, and Google Meet. |
After-Sales Support | Get at least a 12-month warranty and local help if needed. |
Price per Unit (Volume) | Try to pay less than $1,000 each if you buy a lot. |
TCO Benchmark | Think about the total cost, including repairs and power. |
Response Time | The touch screen should react in under 50ms. |
Durability Rating | IP54 or higher keeps out dust and water. |
Built-in Microphone Array | It must have noise-canceling microphones for clear sound. |
Expandability | Check if you can add webcams or other devices later. |
Content Management System (CMS) | Cloud-based CMS lets you update lessons from anywhere. |
Tip: Always use an installation guide to make sure the podium works with your classroom technology before you buy it.
Pricing Options
Digital podiums can cost very different amounts. Some cost $1,578 and others cost up to $6,745.62. Some brands give you a lower price if you buy many at once. You should use a guide to compare prices and features. Do not just look at the first price. Think about how much you will spend over time on repairs and upgrades.
Model Name | Price |
|---|---|
Empire Lectern | $6,745.62 |
CS2 Lectern | $1,996.50 |
Column Acrylic Lectern With AV Connections | $1,578.00 |
VH1 Standard Lectern | $1,595.00 |
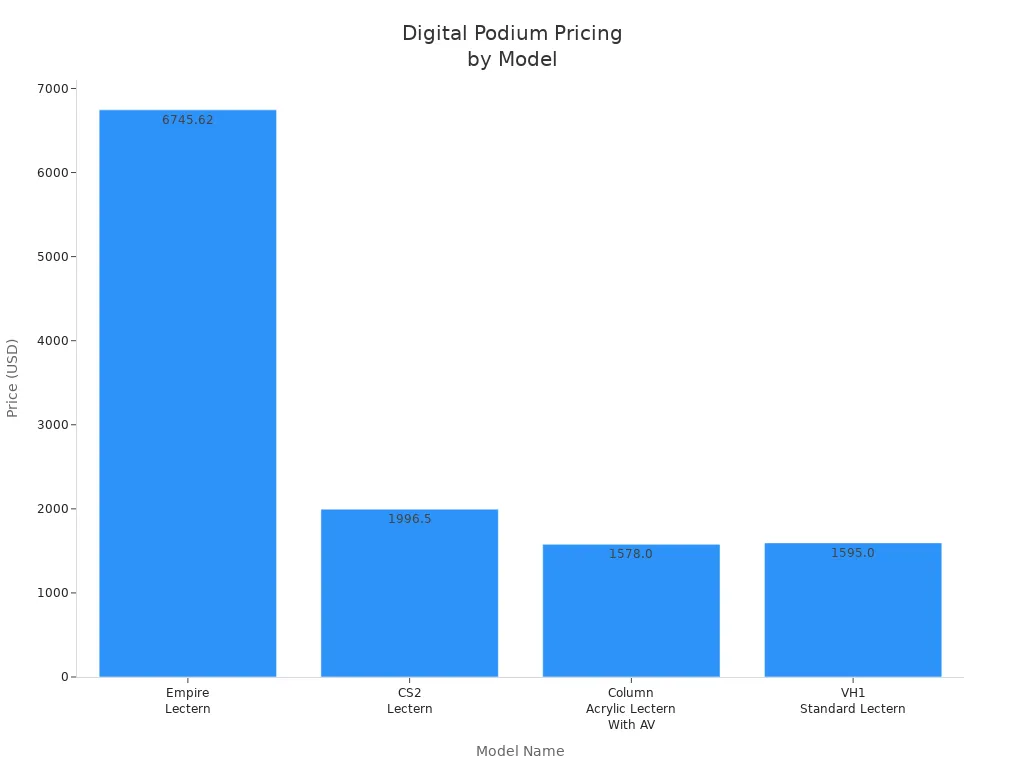
Note: Use an installation guide to check if the podium fits your budget and works with your classroom technology.
Making an Informed Decision
You need a guide to help you pick the right podium. First, think about how you will use it. Will you use it in a big lecture hall or a small classroom? Check what technology you already have and what you need to connect. Measure your room to make sure the podium fits. Make sure it is easy for everyone to use. Read the installation guide to see how to set it up. Look for a good warranty and support. Do not buy podiums with no brand name or safety checks.
Decide how you will use the podium.
Check what technology you need.
Measure your classroom space.
Make sure it is easy for all students to use.
See what you need for installation.
Look for a warranty and support.
Watch out for any warning signs.
Hybrid teaching is important. Digital podiums help you teach students in the room and online. You can use pictures, write notes live, and control everything from one place. This makes lessons easier to manage and more fun for students. You can move the podium to other rooms if you need to. Simple controls make teaching less stressful.
Callout: Use a guide for every step, from picking features to installing the podium. This helps you get the best results from your classroom technology.
You can set up a digital podium in your classroom by following these steps:
Pick the best spot for your podium.
Put together the hardware and connect your devices.
Link up displays and manage cables.
Install teaching apps and set up software.
Adjust audio and microphones.
Calibrate the touch screen.
Test recording and streaming.
Secure your podium.
Smart digital podiums make lessons more fun and interactive. Check out the table below to see how they help you teach better:
Feature/Benefit | Description |
|---|---|
Use videos, slides, and live notes to keep students interested. | |
Interactive tools | Draw and share ideas in real time for more student participation. |
Remote management | Save time and focus on teaching, not tech problems. |
If you want more help, you can use these resources:
This guide shows you how to install, set up, and use your smart podium.
You’ll find tips for solving common problems.
You can learn how to design your classroom for the best results.
Tip: Follow each step and use the resources to make your digital podium work great for you and your students!
FAQ
What is the main difference between a digital podium and a regular podium?
A digital podium lets you control screens, sound, and lessons from one spot. A regular podium just holds your notes. With a digital podium, you can teach in new ways and keep students interested.
Can I use a digital podium for both in-person and online classes?
Yes! You can teach students in the room and online at the same time. The digital podium connects to video calls, so everyone can see and hear you clearly.
How do I keep my digital podium safe from damage or theft?
Lock the podium when you finish using it. Use strong passwords for all accounts. Clean it often and check for loose parts. If you see anything wrong, fix it right away.
What should I do if the touch screen stops working?
First, restart the podium. Check all cables and make sure they are tight. If it still does not work, look at the user guide or ask for help from your tech team.
Can I use an intelligent digital podium for conference rooms in my classroom?
Yes, you can! These podiums work well in both conference rooms and classrooms. They help you control devices, share screens, and make lessons or meetings run smoothly.
See Also
A Comprehensive Guide to Installing Digital Display Signage
Your Complete Guide to Choosing Outdoor Digital Signage
Step-by-Step Instructions for Local Server Digital Signage
Simple Steps for Installing and Configuring Signage Software